In preparation for a talk I would like to give at Desert Code Camp I am adding a React Native front end to my simple counting app built in rails. I would like to provide the same real-time capabilities in my React Native version as I have in my rails front-end. In order to do this, I need to find a way to open a web socket connection between my React Native app and my rails back end. I think the best way to approach this problem is to understand how the web socket connection in my rails front-end works and then see how I can port it over to React Native.
Let’s start by taking a look at the network tab when I load the page.
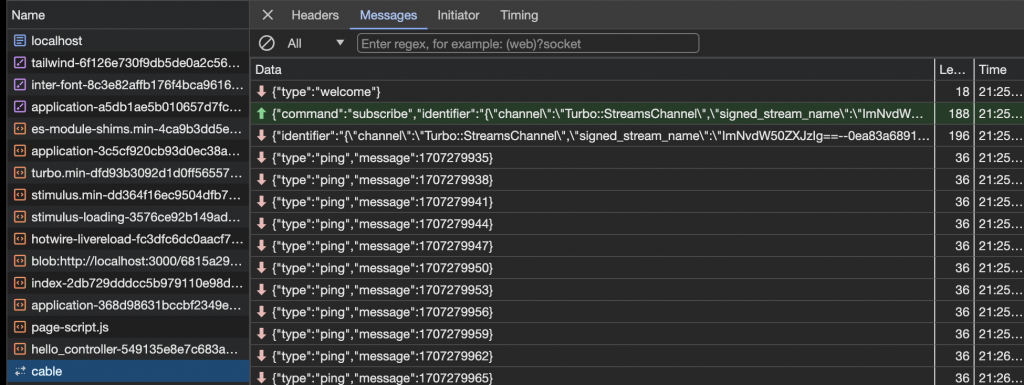
I see a websocket connection to ws://localhost:3000/cable
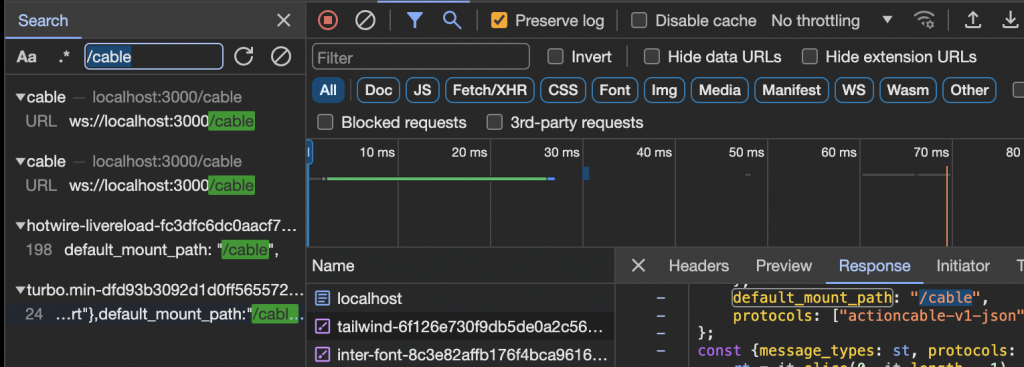
Now if I search (cmd-f) for “/cable” I see that this connection is setup by the javascript with the name starting with turbo.min
This javascript does not look like the easiest to understand just by looking at it (somewhat minified). So I will ask Leo for a simple set of code to open a websocket connection in javascript. Here’s what Leo gave me:
const webSocket = new WebSocket("ws://example.com/ws");
webSocket.connect();
webSocket.onmessage = (event) => { console.log("Received message:", event.data); };
Now my guess is that this will not work directly without some headers that authenticate the request, but I will give it a try. I create an html page with the above script, replacing example.com/ws with localhost:3000/cable and here’s what I get:

I’m not seeing the data I expect, so I need to dig further into what kind of websocket connection is being created by Turbo. After scanning through the turbo javascript a bit more, I notice that the websocket is opened with something called a “protocol.” This can also be seen on the working cable connection in the network tab looking at the headers:

The protocol in question is called actioncable-v1-json so I place that in my test html page and try again. Now my first line of script looks like this:
const webSocket = new WebSocket("ws://localhost:3000/cable", { protocol: 'actioncable-v1-json' });
Now when I open my test page, I get nothing. No websocket called cable at all. I look at my console and see this:
Uncaught DOMException: Failed to construct 'WebSocket': The subprotocol '[object Object]' is invalid.
I decide to search for the WebSocket documentation and learn that Leo has steered me wrong. According to MDN I need to provide the protocols as a string or array of strings, not an object with a property of protocol. So I change the line to this:
const webSocket = new WebSocket("ws://localhost:3000/cable", "actioncable-v1-json");
Now I’m seeing the websocket called cable again and I see the Sec-Websocket-Protocol header under Request headers in my network tab. But I’m still not seeing any data, and I notice in my console that I have two errors:

That first error makes me think AI steered me wrong again, so I look at the MDN documentation and indeed, there is no “connect” method. It looks like the WebSocket should automatically connect when I create it. So I remove that line. Ok, after refresh I just have the “WebSocket connection to … failed” error. I think I will need to provide some auth headers somehow. When I compare the working one to the broken one, the main header that stands out to me is “Cookie.” I’m going to try providing that header and see if it will work.
How do I add a header to my WebSocket? I no longer trust Leo on web sockets, so I just Google it with Bing on Brave like the good ol’ days. The second answer to this stackoverflow question gives me a way to make it happen. I try adding document.cookie = followed by the _counting_session cookie from my working page.
At first, it didn’t work. I did a few more searches and then decided to try something. I had been opening my test html file directly from my file system. What if the browser doesn’t send cookies that way? I don’t think it does. When I moved my file into the public folder of my rails app and then opened it from http://localhost:3000/testsocket.html the cookies were set properly and I was able to see ping messages.
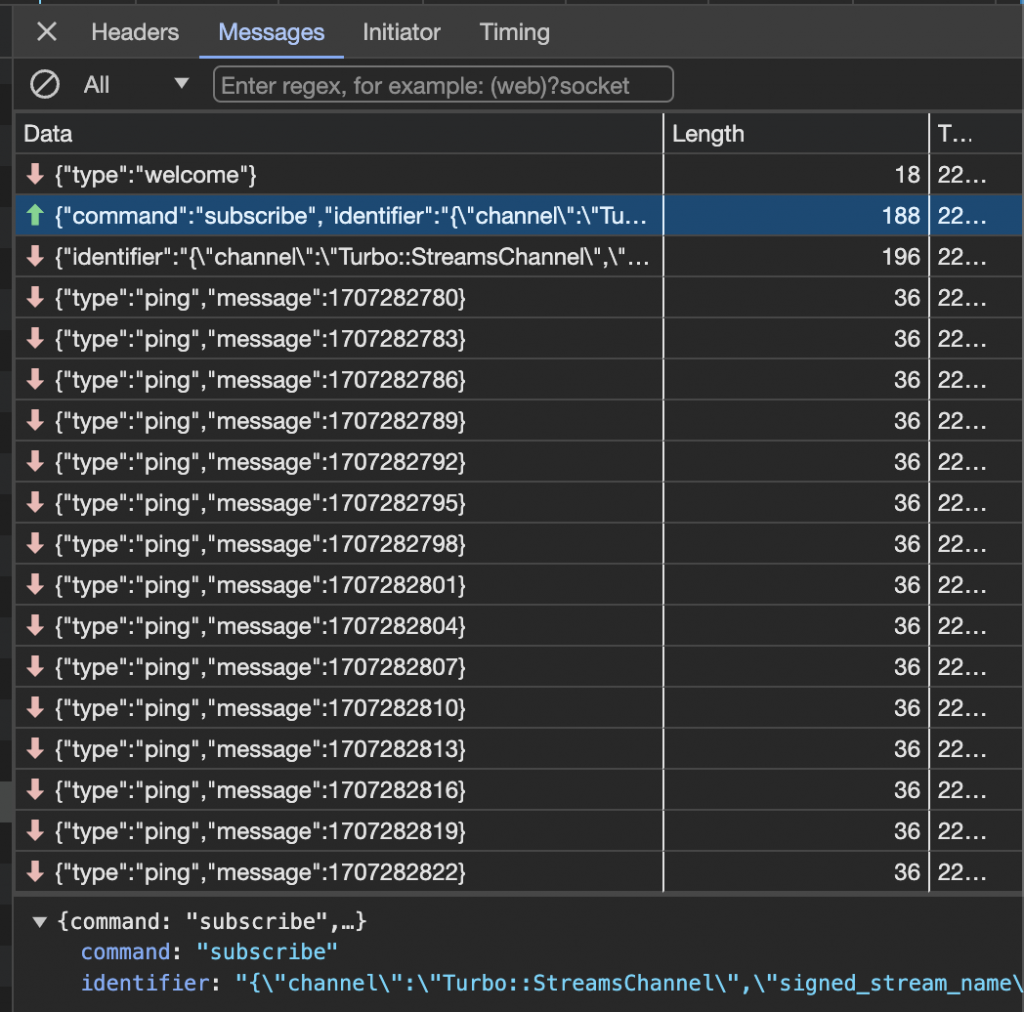
What I didn’t see, however, was the data from my rails app. Comparing the working version to the broken one, I see that the working channel has a message sent that “subscribes” to the turbo stream.
So I replicate this message using this javascript:
webSocket.onopen = (event) => {
        console.log("Connected to server");

        webSocket.send(
          JSON.stringify({
            command: "subscribe",
            identifier: JSON.stringify({
              channel: "Turbo::StreamsChannel",
              signed_stream_name:
                "ImNvdW50ZXJzIg==--0ea83a6891780eeb16ca1638c48c642b78ef6b6a4ea3d1534902108f05af4006",
            }),
          })
        );
      };
Just in case you didn’t read that carefully, that script contains an identifier as stringified JSON wrapped inside stringified JSON sent to the websocket when the websocket opens.
The signed stream name is an element of complexity I expected as I had just read this very helpful tutorial on Turbo Streams and security.
Now that I get the information flowing, I notice one more thing. The information sent via this websocket is the HTML that turbo is sending to the page based on what changed.
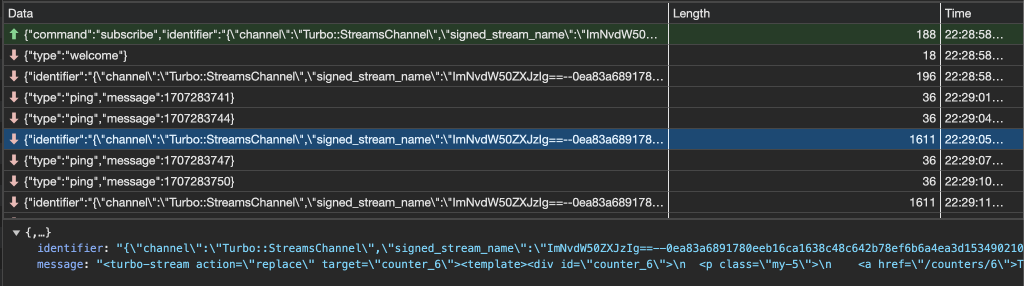
While this works fine in my rails app, it won’t really be ideal for my React Native as it won’t have HTML at all.
In order to make this work on React Native, I will need to figure out the following:
- How to get the session cookie to authenticate the initial websocket call.
- How to get the signed stream name to subscribe to the Turbo Stream.
- How to use the information sent by rails to update my React Native app.
Here’s what I’m thinking I will end up with for each of these:
- Use a custom endpoint authenticated with a signed JWT issued at login to provide the session cookie.
- Use a custom endpoint authenticated with a signed JWT issued at login to provide the signed stream name.
- Create a custom ActionCable stream for the React Native front end that provides the information in JSON form.
Part 2 – Authenticating React Native to Rails
I did a little more testing on what I did yesterday, and it looks like the cookie is actually not necessary for opening the websocket to rails. The only reason it wasn’t working initially appears to be because I was running from an html file on my file system rather than running from a domain. It does not even have to be run from the same domain. I was able to host my html test file from localhost and open a websocket to a deployed instance of my app and it worked just fine without a cookie. This eliminates #1 of what I needed at the end of Part 1.
While I intended to support Google sign-in with my react native app (like I have with my rails app) after looking over the steps required I decided it was not worth my time just for a demonstration app. I will just use basic username/password auth.
I still need the signed stream name. In order to return this securely, I need to be able to login to my rails app from my React Native app. So I set up an authentication mechanism in this commit.
Part 3 – Setting up a stream of JSON
Next, I need my rails app to send JSON when the data relevant to my user changes. I will start by looking to see if I can use the built in turbo broadcast and just customize the format. I googled “customize turbo broadcast stream” and looked at the first thing the Brave search engine referenced, which was the Turbo Handbook. It contains a link to the Broadcastable concern in Turbo. Looking at that file, I see the example below:
    #   class Message < ApplicationRecord
    #     belongs_to :board
    #     broadcasts_to ->(message) { [ message.board, :messages ] }, partial: "messages/custom_message"
    #   end
I’m wondering if I can use a custom partial to return JSON instead of HTML.
I fire up my Visual Studio Code and start my react native app to reorient myself since it has been a few weeks. In order to avoid using my phone and the Expo app, I navigate to my counting-rn folder and use this command to install react-native-web so I can run the react app in my browser:
npx expo install react-native-web react-dom @expo/metro-runtime
Then I run npx expo start and hit W. My browser opens up to http://localhost:8081/ and I am able to see my login interface I created. I enter my credentials and hit Login. Then I realize that I have not started my rails app, so I open another terminal and run bin/dev from my root folder. I try the Login button again and realize that I need to use localhost as my base URL. So I change this in client.js. Then I try again. I get a CORS error because I’m now trying to use my browser. So I install the gem rack-cors in my bundle and add this block to my rails app in the config/environments/development.rb file:
  config.middleware.insert_before 0, Rack::Cors do
    allow do
      origins 'localhost:8081'
      resource(
        '*',
        headers: :any,
        methods: [:get, :patch, :put, :delete, :post, :options]
        )
    end
  end
Then I realize that the response from my rails app, hosted on localhost:3000 will not include cookies when the request is made from a browser that is on localhost:8081 anyway, so I give up on this attempt to use react-native-web and go back to opening Expo on my phone. I have to go back and restart my rails app using the command rails s -b 0.0.0.0 instead of bin/dev so that the port is open on my machine’s IP address.
I add the following to my react app to open the websocket:
let stream = '';
let webSocket;
export const openSocket = (streamName) => {
    if (!streamName) {
        streamName = stream;
    }
    else {
        stream = streamName;
    }
    if (webSocket) {
        webSocket.close();
    }
    webSocket = new WebSocket(`ws://${host}/cable`, [
        "actioncable-v1-json"
      ]);

      webSocket.onmessage = (event) => {
        console.log("Received message:", event.data);
      };

      webSocket.onopen = (event) => {
        console.log("Connected to server");

        webSocket.send(
          JSON.stringify({
            command: "subscribe",
            identifier: JSON.stringify({
              channel: "Turbo::StreamsChannel",
              signed_stream_name: streamName,
            }),
          })
        );
      };

      webSocket.onclose = (event) => {
        console.log("Disconnected from server");
      };

      webSocket.onerror = (event) => {
        console.error("Error:", event);
      };
}
The next step is to figure out how to get the signed stream name when I login. Turns out this is pretty simple. The following line of ruby gets the stream name:
signed_stream_name = Turbo::StreamsChannel.signed_stream_name(:counters)Now, this is not currently secured to my user’s counters, but I will handle that later. The stream is now successfully showing messages in my react console whenever the data changes in my counters on my rails app. But it is still in HTML form. So I go back to that Broadcastable idea and try adding this to my model:
broadcasts_to ->(counter) { :counters }, partial: "counters/counter_data"
After experimenting for a while in my rails app, I realize that what I need is not to broadcast to a partial, but rather to broadcast with a template. So I add this to my model:
    after_update_commit :update_clients

    def update_clients
        broadcast_replace_to "counters_json", template: "counters/_counter_data"
    end
And I create a partial called _counter_data.erb with this:
<%= counter.to_json %>Then I change my line that returns the stream name to say this:
signed_stream_name = Turbo::StreamsChannel.signed_stream_name("counters_json")Now my react app shows this when I make a change to a counter:
LOG Received message: {"identifier":"{\"channel\":\"Turbo::StreamsChannel\",\"signed_stream_name\":\"ImNvdW50ZXJzX2pzb24i--ee00a02ef3249b8885a9aed19ab0d0a9e0efe5575503a20eded238025ddc2192\"}","message":"\u003cturbo-stream action=\"replace\" target=\"counter_6\"\u003e\u003ctemplate\u003e{\u0026quot;number\u0026quot;:7,\u0026quot;id\u0026quot;:6,\u0026quot;name\u0026quot;:\u0026quot;Test counter \u0026quot;,\u0026quot;created_at\u0026quot;:\u0026quot;2023-11-20T03:57:36.354Z\u0026quot;,\u0026quot;updated_at\u0026quot;:\u0026quot;2024-02-25T21:12:35.673Z\u0026quot;,\u0026quot;user_id\u0026quot;:1}\n\u003c/template\u003e\u003c/turbo-stream\u003e"}It doesn’t look like it, but there is JSON in there (encoded and escaped). So I need to add some code in my react app to decode/unescape it.
let json = data.message.substring(data.message.indexOf("<template>")+10);
json = json.substring(0, json.indexOf("</template>"));
json = json.replace(/"/g, '"');
json = JSON.parse(json);Finally, I need to update my react component with the latest data from the JSON. So I add this snippet:
const newCounters = counters.map((counter) => {
  if (counter.id === json.id) {
    counter.number = json.number;
  }
  return counter;
});
setCounters(newCounters);
It works! Now whenever I change the counter on the rails app, the react app shows the change in real time. Here is the commit.